
Last Updated: June 2026 | Reading Time: 8 minutes
Why Regular Cleaning Matters
Laptops accumulate dust, skin oils, food particles, and environmental debris continuously. These contaminants degrade performance, shorten lifespan, and create hygiene concerns. Dust clogging cooling vents forces fans to spin faster and louder while failing to cool components adequately. Thermal throttling follows, reducing processor speed and battery efficiency. Over months, accumulated heat stress accelerates wear on solder joints and capacitors.
Keyboards harbor surprising bacterial density. Studies consistently rank laptop keyboards among the dirtiest surfaces in homes and offices, exceeding toilet seats in microbial load for frequently used machines. Food residue attracts pests and corrodes key mechanisms. Liquid spills destroy electronics instantly or cause gradual corrosion that manifests as erratic behavior months later.
Screen coatings suffer from improper cleaning. Ammonia-based glass cleaners strip antiglare treatments. Abrasive cloths scratch polarizing filters. Pressure during cleaning damages liquid crystal alignment. Proper technique preserves display quality for years while improper methods cause permanent damage in seconds.
Essential Cleaning Supplies
Gather appropriate materials before starting. Improvising with household substitutes risks component damage.
- Microfiber cloths: At least three—one for screens, one for surfaces, and one for the keyboard and ports. Washable and reusable. Avoid paper towels, tissues, or clothing that contains abrasive fibers.
- Compressed air cans: For blasting dust from vents, fans, and keyboard crevices. Choose cans with thin straws for precision. Electric air blowers offer reusable alternatives with stronger sustained airflow.
- Isopropyl alcohol (70% or higher): Disinfects surfaces, dissolves oils, and evaporates without residue. Higher concentrations dry faster; 90% or 99% is ideal for electronics. Never use rubbing alcohol with added fragrances or moisturizers.
- Cotton swabs: For detailed cleaning around keys, ports, and edges. Wooden stick varieties are preferable to plastic, which can snap and scratch.
- Soft-bristled brush: A clean makeup brush, paintbrush, or dedicated electronics brush dislodges dust without generating static.
- Screwdriver set: Precision Phillips and Torx drivers for removing bottom panels on some cleaning procedures.
- Distilled water: For dampening cloths when alcohol is unavailable or for mixing diluted cleaning solutions. Tap water contains minerals that leave residue.
Pre-Cleaning Safety Steps
Electronics and liquids are incompatible. Power elimination prevents short circuits during accidental moisture contact.
Power Down Completely
Shut down through the operating system. Do not use sleep or hibernate modes, which maintain partial power to memory and circuits. Wait for all lights to extinguish and fans to stop spinning.
Disconnect All Cables and Peripherals
Remove the power adapter, USB devices, external monitors, and any inserted media. For laptops with removable batteries, detach the battery pack after powering down. For internal batteries, proceed carefully knowing residual charge remains in capacitors.
Ground Yourself
Touch a metal faucet or grounded appliance before handling internal components. Static electricity damages sensitive circuits. Avoid cleaning on carpeted surfaces. Work on wood, tile, or anti-static mats when possible.
Allow Cooling
A recently used laptop runs hot. Components and surfaces cool for thirty minutes before cleaning. Hot surfaces accelerate cleaning solution evaporation, leaving streaks. Internal fans may start unexpectedly if the machine is warm, spraying dust unpredictably during compressed air application.
Cleaning the Exterior Surfaces
Exterior cleaning addresses the chassis, lid, and palm rest where oils and grime accumulate most visibly.
Dampen a microfiber cloth with isopropyl alcohol. The cloth should feel slightly cool to touch, never wet or dripping. Wring out excess liquid thoroughly. Wipe all exterior surfaces with gentle pressure, following the grain of brushed metal if present. Pay attention to palm rests where skin contact deposits oils, edges where hands grip during transport, and the lid where fingers leave prints.
For stubborn marks, apply slightly more pressure or re-dampen the cloth. Persistent adhesive residue from stickers benefits from brief alcohol soaking—lay the damp cloth over the residue for thirty seconds to dissolve the adhesive before gentle scraping with a plastic card edge. Never use metal tools that scratch anodized finishes.
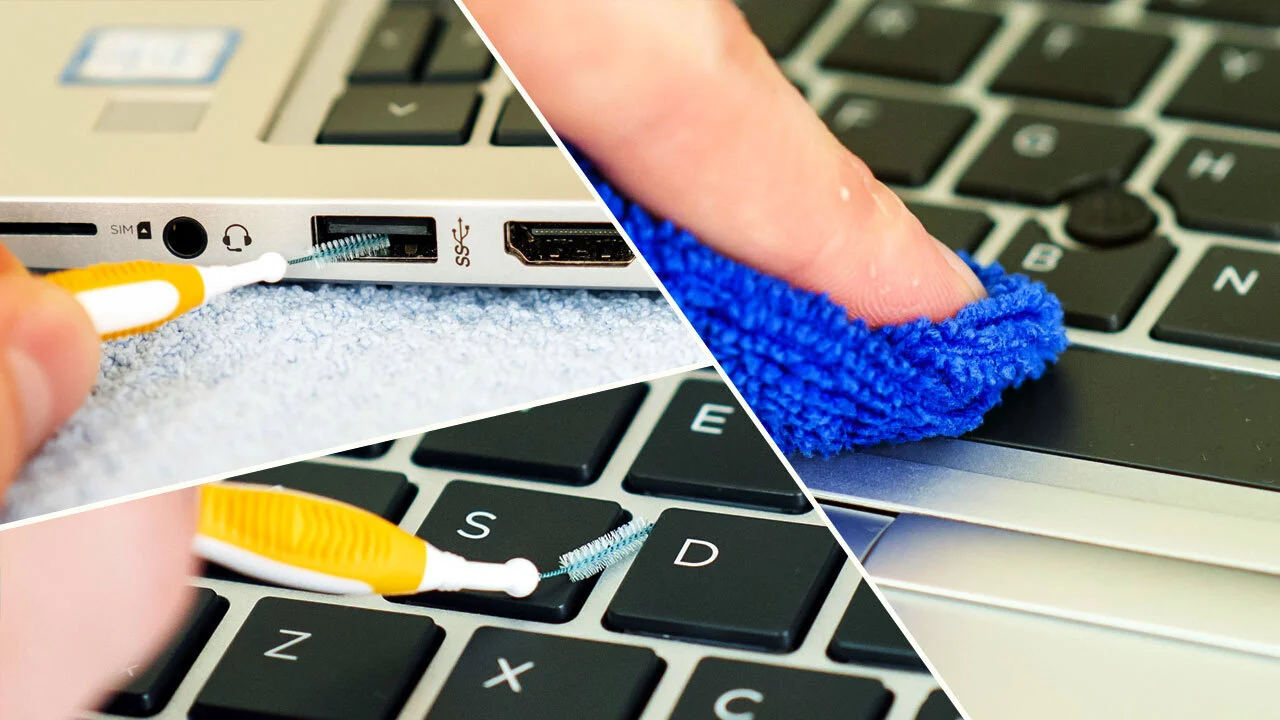
Clean ports and vents with dry methods first. Moisture in USB ports, audio jacks, or charging connectors causes corrosion and intermittent connections. If ports require cleaning, use minimal alcohol on cotton swabs, insert briefly, and allow extended drying before reconnecting cables.
Cleaning the Screen
Displays require the gentlest treatment. Modern screens combine multiple delicate layers: glass or plastic cover, polarizing filter, liquid crystal layer, backlight diffuser, and anti-glare or anti-fingerprint coating. Damage to any layer manifests as permanent visual defects.
Dry Cleaning First
Always attempt dry removal of dust and particles before introducing liquid. Hold the laptop at an angle under good lighting to identify debris. Gently brush loose particles with a clean, soft brush or blow them away with compressed air from a distance. Wiping across grit scratches the surface permanently.
Dampened Cloth Technique
Use a clean microfiber cloth dedicated solely to screens. Dampen with distilled water or a 50/50 mixture of distilled water and isopropyl alcohol. The cloth should be barely moist—wring it until no liquid squeezes out. Wipe in gentle circular motions from center to edges. Apply minimal pressure; let the cloth do the work.
For fingerprint oils, breathe lightly on the screen to create condensation, then wipe immediately with the dry portion of the cloth. This often removes minor smudges without additional liquid.
Avoiding Common Screen Damage
Never spray liquid directly onto the screen. Liquid seeps into edges, damaging backlight components and creating dark spots. Never use paper products that scratch. Never press hard on the display; this distorts liquid crystals and can crack the panel. Never clean while the laptop is open at extreme angles; this stresses hinges and increases drop risk.
Cleaning the Keyboard
Keyboards collect hair, crumbs, skin flakes, and liquid residue in spaces between keys. This debris interferes with key travel, causes sticking, and creates unhygienic conditions.
Surface Debris Removal
Hold the laptop vertically or upside down at a 75-degree angle. Tap the bottom edge gently against a clean surface. Gravity dislodges loose particles. Follow with compressed air directed between keys from multiple angles. Use short bursts to avoid condensation buildup from the can. Keep the straw nozzle moving; sustained airflow in one spot can force dust deeper or damage delicate mechanisms.
Key Cap Cleaning
Individual key surfaces with alcohol-dampened cotton swabs. Work between keys where cloths cannot reach. Replace swabs frequently as they accumulate grime. For shiny key wear from finger oils, gentle rubbing with a slightly more dampened cloth restores appearance temporarily. Permanent shine from worn texture requires key cap replacement.
Deep Cleaning (Key Removal)
Some laptop keyboards allow key cap removal for thorough cleaning beneath. Research your specific model before attempting; manufacturers vary in key attachment mechanisms. Most use scissor switches with delicate plastic clips that break under improper force.
If proceeding, photograph the keyboard layout first. Use a key cap puller or flat plastic tool to lift keys straight up, never prying at angles. Clean the exposed membrane with compressed air and slightly dampened cotton swabs. Allow complete drying before reattaching keys. Press each key firmly until clips engage. Test all keys functionally afterward.
Cleaning Internal Components
Internal cleaning addresses cooling systems where dust accumulation most impacts performance. This requires opening the laptop chassis and carries warranty implications.
Determine Access Method
Many laptops feature removable bottom panels secured by screws. Others require removing rubber feet, keyboard decks, or entire bottom covers. Some ultrabooks and MacBooks are sealed units with no user-serviceable interior. Attempting to open sealed machines voids the warranty and risks irreparable damage.
Consult your service manual or Fixit guides for specific disassembly instructions. Organize screws by size and location. Use magnetic trays or labeled containers. Photograph each stage for reference during reassembly.
Fan and Heat Sink Cleaning
Once accessed, locate the cooling fan and heat sink assembly. Hold the fan stationary with a finger or soft tool to prevent spinning during air application. Spinning fans generate electricity that can damage circuits. Blast dust from the fan blades and surrounding housing with compressed air directed outward—push dust out of the machine, not deeper in.
Heat sinks feature thin metal fins that clog with dust. Clean between fins with gentle brushing followed by compressed air. Bent fins reduce cooling efficiency; straighten carefully with tweezers if needed. Thermal paste between the CPU and heat sink degrades over years. Replacement requires complete cooler removal and is addressed separately from routine cleaning.
Reassembly Verification
Ensure all connectors are seated firmly. Loose ribbon cables for keyboards, trackpads, or displays cause mysterious failures. Replace screws in their original locations—mixing lengths can strip threads or puncture batteries. Power on and verify all functions before considering the task complete.
Addressing Liquid Spills
Immediate response determines whether a spill causes temporary inconvenience or total loss.
Immediate Actions
Power off instantly by holding the power button if necessary. Disconnect the charger. Remove the battery if accessible. Invert the laptop in a V-shape with the keyboard facing down and the screen supported at an angle. This prevents liquid from flowing deeper into the chassis toward the motherboard.
Blot visible liquid with absorbent cloths. Do not rub, which spreads contamination. Absorb what you can externally, then leave the machine inverted for at least 24 hours in a dry, ventilated area. Fans or low-setting hair dryers accelerate drying but avoid heat, which warps components.
Post-Drying Assessment
After thorough drying, attempt to power on. Sticky keys may resolve with additional cleaning. Erratic behavior, failure to boot, or unusual smells indicate internal damage requiring professional assessment. Corrosion continues even after drying; prompt professional cleaning with specialized solutions offers the best recovery chance for valuable data and hardware.
Never attempt to power on a recently spilled laptop to “check if it works.” Electricity plus residual moisture destroys components that drying might have saved.
Establishing a Cleaning Schedule
Consistency prevents accumulation that demands aggressive cleaning.
| Frequency | Tasks | Environment |
|---|---|---|
| Weekly | Wipe screen and exterior with dry microfiber cloth | Dusty, pet hair, heavy travel, shared use |
| Bi-weekly | Clean keyboard surface with compressed air on visible debris | Standard office or home use |
| Monthly | Full exterior cleaning with alcohol, screen deep clean | Clean environments, light personal use |
| Quarterly | Internal fan and vent cleaning if accessible | All environments, especially with pets or smokers |
| Annually | Professional internal service or thorough self-service | High-performance machines, warranty considerations |
Related Articles
- How to Extend Your Laptop Battery Life
- How to Speed Up a Slow Windows Laptop
- How to Upgrade Your Laptop RAM Step by Step
- How to Choose the Right Laptop for Remote Work
- How Thermal Paste Affects Your CPU Performance
Sources and References
- Consumer Reports. (2025, August 12). How to Clean Your Laptop: Screen, Keyboard, and Interior Maintenance Guide. Retrieved from consumerreports.org
- iFixit. (2026). Laptop Cleaning and Maintenance: Disassembly Guides by Manufacturer. iFixit Repair Wiki.
- Environmental Protection Agency. (2025). Electronics Cleaning and Disinfection: Safe Product Use Guidelines. EPA Safer Choice Program.
- Dell Technologies. (2025). Alienware and Latitude Cleaning Procedures: Official Service Manual. Dell Support Documentation.
- Gerba, C. P., & Maxwell, S. (2025). Microbial contamination of personal electronic devices in office and home environments. Journal of Applied Microbiology, 138(3), 892-901.